

Take Home Points
- High energy trauma causes femur fractures, look for other injuries
- The SPEEDSPLINT uses a velcro traction ankle hitch, you will need practice doing this
Introduction
In emergency medicine, we’re often faced with high-stakes situations where every second counts. Femur fractures are one of those critical injuries that demand our immediate attention. Not only do they cause excruciating pain, but they also carry the risk of significant blood loss and other complications1. Over the years, I’ve noticed that applying a femoral traction splint quickly and effectively can make a world of difference for our patients. That’s why I wanted to share this step-by-step guide on using the SPEEDSPLINT—so we can all be prepared when it matters most.
Editors Note: The Femoral Traction SPEEDSPLINT is something many EM learners have trouble with. The idea is simple, stabilize and immobilize the lower extremity, but when it comes to applying axial traction on the ankle hitch, we’re all left looking cluelessly at the velcro straps.
Understanding Femur Fractures
Mechanism of Injury
Femur fractures usually result from high-energy trauma—think motor vehicle accidents or significant falls2. Understanding this helps us anticipate other potential injuries. For instance, a patient with a femur fracture from a car crash might also have pelvic fractures or internal injuries.
Common Patterns of Fracture
- Transverse Fractures: Straight across the bone, typically from direct impact.
- Spiral Fractures: Caused by a twisting force.
- Comminuted Fractures: The bone shatters into multiple pieces due to high-impact trauma.
- Open Fractures: The bone breaks through the skin, increasing infection risk3
Associated Injuries
- Vascular Injury: Damage to the femoral artery can lead to severe bleeding4
- Nerve Injury: The sciatic or femoral nerve may be affected, causing sensory or motor issues.
- Compartment Syndrome: Swelling increases pressure in the thigh, compromising circulation5
Complications of Femur Fractures
- Hemorrhagic Shock: Significant blood loss (up to 1.5 liters) can lead to shock. Rapid stabilization is crucial here.
- Fat Embolism Syndrome: Fat particles entering the bloodstream can cause respiratory distress6
- Infection: Especially in open fractures, the risk of infection like osteomyelitis is higher
- Non-Union or Malunion: Improper healing can result in long-term issues.
Indications and Contraindications for a Femoral Traction Splint
Indications
- Isolated Mid-Shaft Femur Fractures: Helps align the bone and reduce muscle spasms7
- Closed Fractures: When the skin isn’t broken, reducing infection risk.
- Stabilization During Transport: Prevents further injury on the way to definitive care.
Contraindications
- Pelvic Fractures: Traction might worsen the injury and increase bleeding8
- Knee or Ankle Injuries: Could cause additional harm.
- Open Femur Fractures with Bone Exposure: Risk of further soft tissue damage and infection3.
- Multiple Fractures in the Same Limb: Traction may not be safe or effective.
Step-by-Step Guide to Applying the SPEEDSPLINT Femoral Traction Splint
I’ve found that being familiar with the equipment and practicing regularly makes a big difference when time is of the essence.
Equipment Needed:
- SPEEDSPLINT femoral traction splint
- Ankle hitch/strap
- Adjustable pole/rod
- Straps for securing the thigh and leg
- Padding materials
Step 1: Preparation
- Assess the Patient: Ensure ABCs—airway, breathing, circulation—are stable9. Quick assessment helps prioritize what needs to be done first.
- Explain the Procedure: If they’re conscious, let the patient know what’s happening. A calm patient can make the process smoother.
- Position the Limb: Gently support the injured leg without forcing alignment.
Step 2: Apply the Ankle Hitch
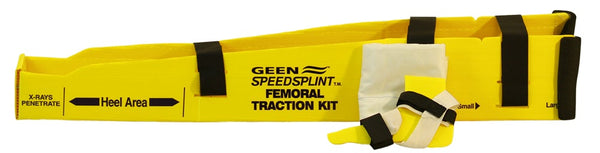
- Locate the Ankle Strap: This can be tricky the first few times10. It’s worth practicing so it becomes second nature. In the newer kits, the ankle strap/hitch will come with a fake “foot” so you can see how t oapply it
- Wrap Around the Ankle: Place the padded part against the Achilles tendon. The hitch goes around the front of the ankle
- Secure It: Make sure it’s snug but not cutting off circulation.
Step 3: Adjust the Splint Length
- Measure: Extend the splint so it’s longer than the leg—from hip to beyond the foot.
- Lock It In: Use the built-in mechanism to secure the length.
Step 4: Position the Splint
- Place Alongside the Leg: The top should rest against the groin; the bottom extends past the foot.
- Align Properly: Ensure it’s in line with the leg without causing extra pain.
Step 5: Secure the Thigh and Leg Straps
- Apply the Thigh Strap: Wrap it around the upper thigh, avoiding the fracture site.
- Add Additional Straps: Secure around the lower thigh and calf.
- Check Tightness: They should be snug but not restrict blood flow.
Step 6: Apply Traction
- Connect the Ankle Hitch: Attach it to the end of the splint.
- Gently Apply Traction: Pull until the leg aligns and the patient feels some relief.
- Lock the Mechanism: Make sure it stays secure.
Step 7: Reassess the Patient
- Check Circulation: Look at pulses, cap refill, skin color
- Monitor Sensation and Movement: Ensure there are no new issues.
- Adjust if Needed: If something’s off, tweak the traction and reassess.
Step 8: Prepare for Transport
- Stabilize Everything: Double-check that all parts are secure.
- Keep Monitoring: Watch vital signs and the injured limb.
- Communicate with the Team: Let everyone know what’s been done and any concerns.
These steps are covered well in this laughably old but still accurate video:
Conclusion
Being able to quickly and effectively apply the SPEEDSPLINT is a crucial skill in our field. It not only helps minimize complications but also significantly improves patient comfort and outcomes. I can’t stress enough the importance of regular practice with this equipment. It’s one of those things where muscle memory can really make a difference when seconds count.
Author
Cite this post: Tayab Waseem, MD, “Applying the SPEEDSPLINT Femoral Traction Splint: A Practical Guide for Only the brightest EM Physicians”. GW EM Blog. 2/5/2025. Available at: https://gwemblog.com/speedsplint/
Related Posts:
rMETRIQ Score: Not yet rated/21
References
- Swiontkowski MF. Intramedullary nailing of femoral shaft fractures. J Bone Joint Surg Am. 1994;76(2):282-294. ↩︎
- Lee C, Porter KM. The prehospital management of pelvic and femoral fractures. Emerg Med J. 2007;24(2):130-133. ↩︎
- Gustilo RB, Anderson JT. Prevention of infection in the treatment of one thousand and twenty-five open fractures of long bones. J Bone Joint Surg Am. 1976;58(4):453-458. ↩︎
- Hooper GJ, Lyon DW. Conservative management or closed nailing for femoral shaft fractures. J Bone Joint Surg Br. 1993;75(1):23-26. ↩︎
- McQueen MM, Gaston P, Court-Brown CM. Acute compartment syndrome. Who is at risk? J Bone Joint Surg Br. 2000;82(2):200-203. ↩︎
- Gurd AR. Fat embolism: an aid to diagnosis. J Bone Joint Surg Br. 1970;52(4):732-737. ↩︎
- American College of Surgeons Committee on Trauma. Advanced Trauma Life Support (ATLS) Student Course Manual. 10th ed. American College of Surgeons; 2018. ↩︎
- Bottlang M, Krieg JC, Mohr M, Simpson T, Madey SM. Emergent management of pelvic ring fractures with use of circumferential compression. J Bone Joint Surg Am. 2002;84(Suppl 2):43-47. ↩︎
- Tintinalli JE, Ma OJ, Yealy DM, et al., eds. Tintinalli’s Emergency Medicine: A Comprehensive Study Guide. 9th ed. McGraw-Hill Education; 2019. ↩︎
- SPEEDSPLINT Instruction Manual. Manufacturer’s guidelines on application. ↩︎